Main Window
Title bar
The controls at the top let you switch between Chinese, Japanese, and English and perform these actions:
- Refresh Current SS: captures the current Scene view. If the scene contains at least two avatars, it saves the current avatar configuration.
- Refresh All SS (Please Wait): opens each scene in the library and takes a standard scene screenshot. A progress indicator is shown, and you can cancel partway through.
- GUID Tool: checks and repairs the association between scene paths and GUIDs.
- SS Settings: selects PNG/JPEG and JPEG quality.
Updating avatar configuration screenshots
Refresh All SS does not load and capture each avatar configuration. To update a configuration, load it first, then use the toolbar screenshot button or Refresh Current SS. A bulk refresh may cause existing configurations to be marked as outdated.
Center panel: screenshot gallery
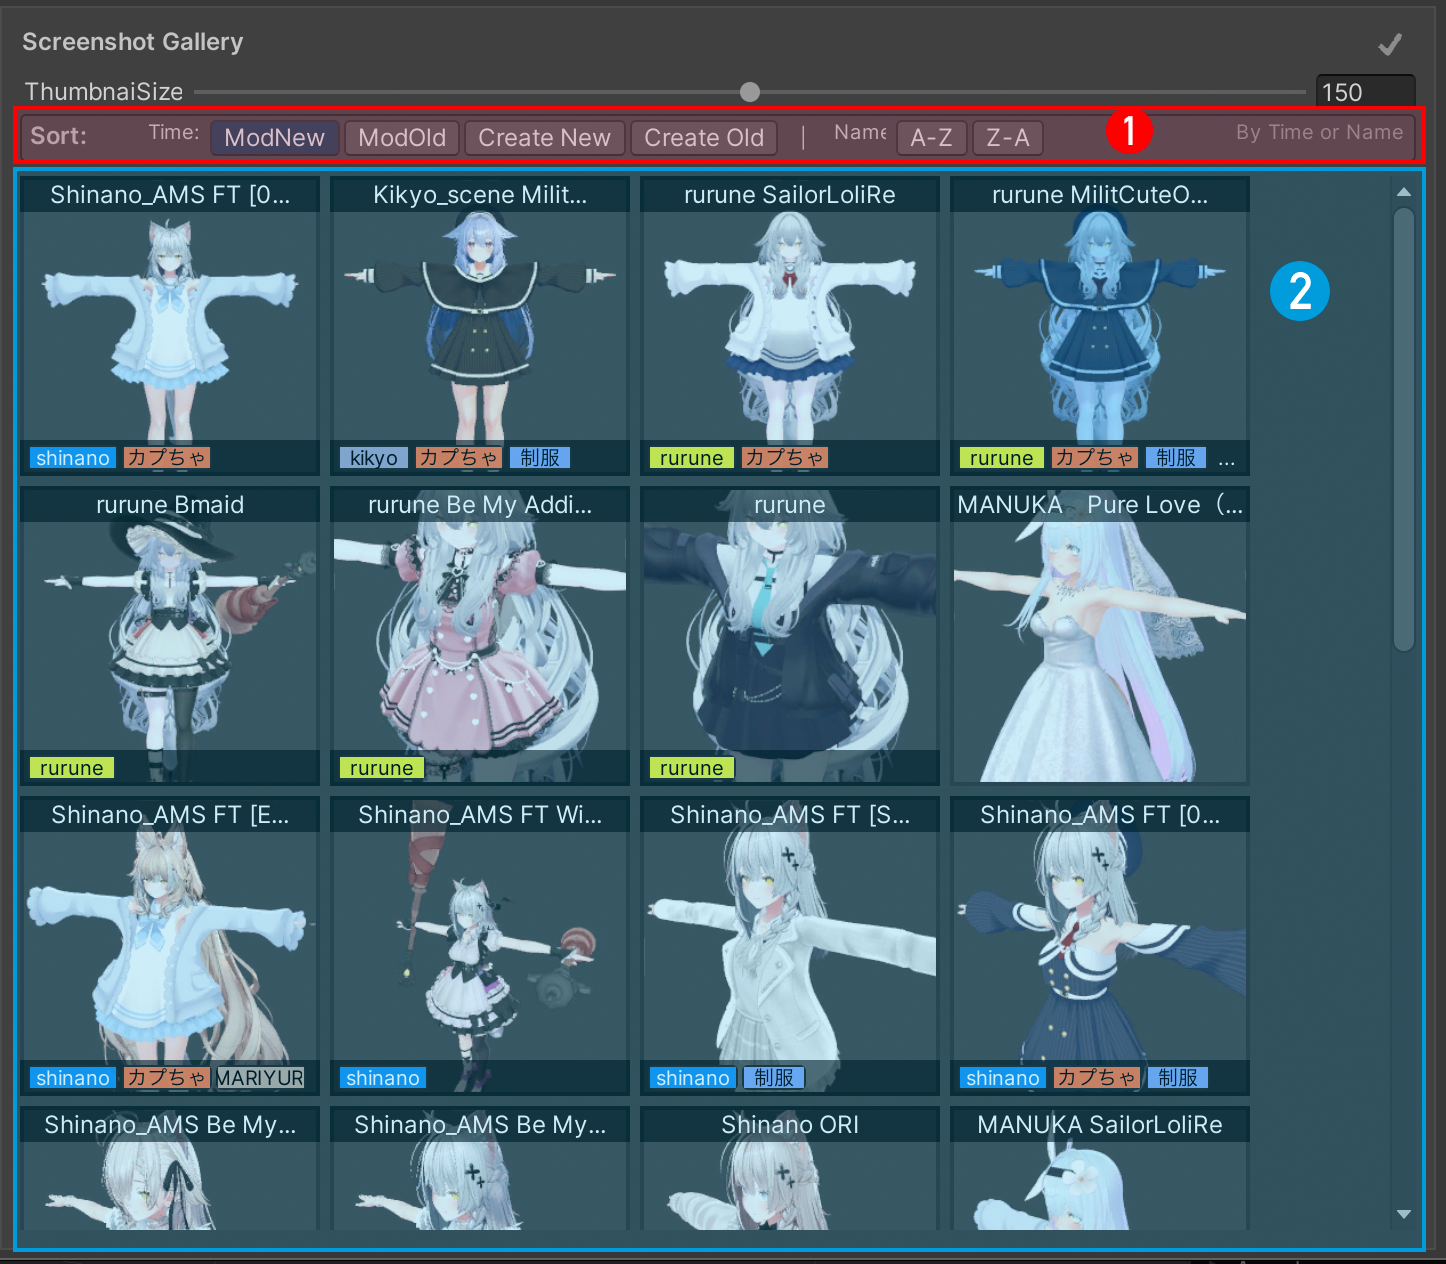
The gallery shows recorded scene screenshots and avatar configuration screenshots. Multiple configurations from the same scene appear as separate thumbnails.
A selected thumbnail has a border indicating its type. Unselected thumbnails do not have a colored border:
- Blue border: a standard scene screenshot, normally used for scenes with one or no avatars.
- Green border: an avatar configuration screenshot, recording a combination of active avatars in a scene containing multiple avatars.
① Thumbnail size and sorting
Drag the slider to resize thumbnails. You can sort by name, creation time, or modification time, in either direction.
How time-based sorting works
Sorting uses timestamps saved by the plugin, not the modification time of the Unity scene file on disk. Retaking a configuration screenshot updates its modification time while keeping its original creation time.
② Screenshot area
Click a thumbnail to see its details. Double-click a standard screenshot to open the scene. Double-click an avatar configuration screenshot to open the scene and load the configuration.
The search box on the left matches scene paths, so you can enter a scene name or folder name. It does not search avatar configuration names. You can also filter by tags. When you select several tags, an item must match all of them. Matching scene tags show that scene's configurations; configurations can also match through their own tags. Click Clear to remove the tag filters.
③ Status indicators beside Scene Library
- The number beside the single-person error icon counts records whose scene files cannot be found.
- The number beside the multiple-person error icon counts configurations in the current gallery with outdated-data or missing-avatar warnings. Missing avatar objects are checked only in the currently active scene.
- A green status icon appears when neither type of issue is detected.
Individual thumbnails
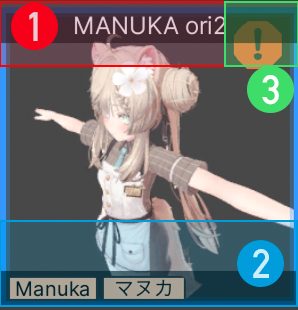
① The top shows the scene name. Avatar configurations show the avatar name, or names joined with + for a combination.
② The bottom shows the scene's or configuration's own tags.
③ An error icon indicates a missing scene file, an outdated configuration, or an avatar that cannot be found. Use the GUID Tool to check scene path issues. Open the scene to investigate avatar object issues.
Context menu
Right-click a standard scene thumbnail to:
- Open the scene.
- Refresh its screenshot.
- Locate the scene file in Unity's Project window or your system file browser.
- Clear all tags from that scene.
- Delete its screenshot data.
For avatar configuration thumbnails, the open commands are Open Scene and Load Configuration and Open Scene Only. Clearing tags and deleting data apply to the selected configuration.
Refreshing from the context menu
The current Refresh Screenshot command takes a standard scene screenshot. It does not restore the selected avatar configuration first. To update a configuration's image, follow the instructions at the top of this page.
Right panel: details
Selecting a thumbnail shows its preview, scene information, and tag controls. Open This Scene opens the scene without loading an avatar configuration.
A standard screenshot lets you edit Scene Tags; an avatar configuration lets you edit Configuration Tags. The × beside a tag removes it from the selected item without deleting the tag itself.
Small buttons
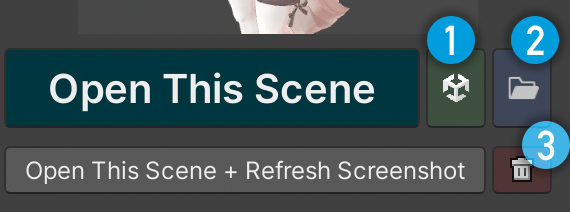
① Locate the scene file in Unity's Project window.
② Locate the scene file in your system file browser.
③ Delete the selected item's screenshot data after confirmation. This does not delete the .unity scene file.
Open This Scene + Refresh Screenshot updates the standard scene screenshot, just like Refresh Screenshot in the context menu.
What gets deleted
Deleting a standard screenshot also removes the scene's browser record. Deleting an avatar configuration removes that configuration and its image. If it is the scene's last configuration, the scene record is removed too, even if a standard screenshot was previously saved. There is no undo command for these deletions.
Avatar Configuration panel
After you select a scene or configuration, the Avatar Configuration panel on the lower right lists the configurations saved for that scene. If there are none, it displays a prompt.
- Each row is a saved combination of avatar active states.
- ★ Green: one active avatar.
- ◆ Orange: several active avatars.
- A configuration with no active avatars is shown in gray.
- ▶: opens the scene and restores the recorded avatar active states.
- ✕: deletes the configuration after confirmation.
Creating or updating a configuration
In a scene containing at least two VRChat avatars, set the active state of each avatar's root object, then click the toolbar screenshot button. A new combination creates a configuration; an existing combination updates its image. Loading a configuration does not restore outfits, materials, or the camera angle used for the screenshot.